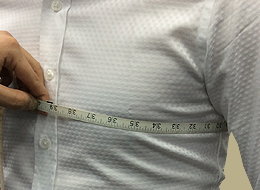
How To Measure

Responsive image
Chest

Place measuring tape around the fullest part of the chest, high up under the arms with two fingers space. Tape should be at level and not so tight.
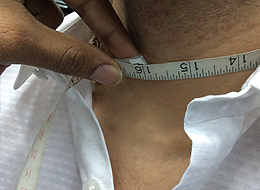
Responsive image
Collar

Place measuring tape around base of neck with one finger space.
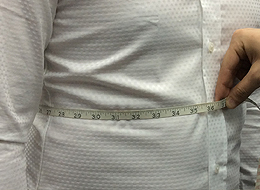
Responsive image
Stomach

Place measuring tape around the stomach with two fingers space and at level over the fullest part of the stomach. Make sure the tape is not so tight.

Responsive image
Hip

Place measuring tape around hips at the hip bone area (fullest part) with two fingers space. Tape should be snug and at level.
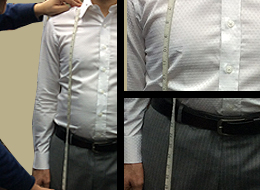
Responsive image
Half Sleeve

Place measuring tape from the shoulder to where you want the cuff to hit and also armpit to cuff.

Responsive image
Full Sleeve

Place measuring Tape from the point where the shoulder seam joins the sleeve, down along the arm to the point below the wrist, and please note add extra 1.5 cm.
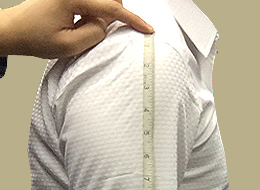
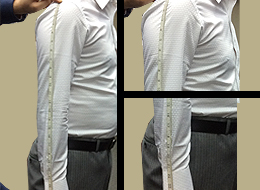
Responsive image
Length

Place measuring tape from the point where the shoulder seam joins the collar vertically to the point of length you require.
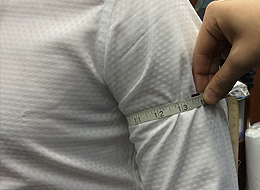
Responsive image
Upper Arm

Place measuring tape around the fullest part of the upper bicep with two fingers space and parallel to the level.
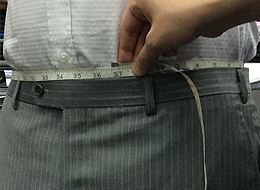
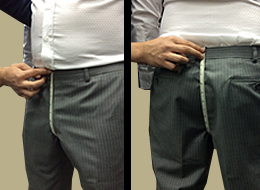
Responsive image
Waist

Place measuring tape around the waistband with two fingers space and make the tape snug or tight according to the body shape.
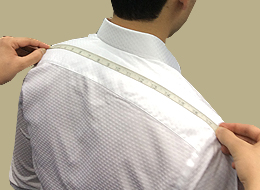
Responsive image
Shoulder

Place measuring tape from the point where the shoulder seam joins the sleeve of one hand to shoulder seam joining the sleeve of the other hand, and then add allowance according to the body shape .(generally 2-4 cm).
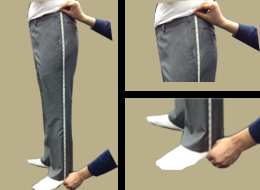
Responsive image
Out & Insem

Place measuring tape from the top of the right waistband to the floor, less 1-1.5 cm.

U-rise

Place the measuring tape from the center of front rise, across the crotch and then up to the center of the back waistband. Make sure to fit well and usually the measurement can be 1 cm large.
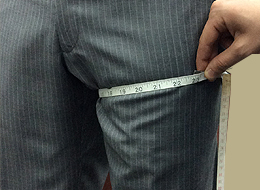
Thigh

Place measuring tape around the thigh near the lowest point of the crotch with two fingers space. Tape should be snug and at level.

Have you been wondering how to get right body measurements?

Or

How to measure correctly?


Described below is the step by step procedure of how to record your body measurements to achieve ideal body measurements. Set yourself with a measuring tape and note with pen so that you can get your body measurements recorded quickly.

1. Measure your neck : With the help of the measuring tape take a note of reading by rounding it around the neck with at least a gap of half an inch or a finger space.

2. Chest measurement : Place the tape under your armpits and wrap your chest with it. Leave the required fitting gap which is usually a finger space or two and note the measurements. Make sure that the tape is placed right above the nipples to get best reading.

3. Sleeve measurement : Keep the tap at one of your shoulder at the exact point from where you need the sleeve to start and stretch it till your wrist, allowing some extra length note the measurements for your full sleeved shirt and the similar way you can measure a half sleeved shirt with required length which is mostly around 1.5 cm.
If you have a helping hand ask the person to hold the tap at your back near mid of neck, and then with a fold in elbows keep the hand on your hips. Take measuring tape stretching from mid of neck to the wrist covering the elbow. This angle also gives right measurements and do not need extra length to be added.
Bicep measurements is apart while crafting a sleeve and hence wrap your tape at your bicep with a gap of finger or two and take a note of measurement.

4. Shoulder measurement : take the measuring tape from one edge of shoulder to the other edge noticing the point where the seam connects with the sleeve line. You can add few cm considering your body and comfort required.

5. Waist and stomach : Wrap the tape around your waist and allow a finger or two gap and record the measurement. The stomach measurement is mainly required for little extra flabs people and same process over upper belly is used to record the measurements.

6. Hip measurement : While taking a hip measurement you need to stand with legs apart around 6 inches and wrap the tape around the hips.

7. U-rise : Take the measuring tape and keep it at front rise calculating the midpoint and then stretch it till the back waist band crossing below the legs and take the note of measurements considering a gap of 1-2 cm.

8.  Inseam : from the crotch to the back heel stretch the tape and measure the details with extra inches depending on the shoe you wear. Also add thigh measurement by wrapping the tape around the thigh with a finger gap.

You are all set to hand over the measurements to your tailor.

Start typing and press Enter to search

Shopping Bag

No products in the cart.